
To elevate your aerial photography, focus on these seven key techniques: Use leading lines to guide the viewer's eye through your image. Apply the rule of thirds for balanced compositions. Highlight symmetry and patterns in landscapes for visual appeal. Incorporate natural frames to draw attention to your main subject. Utilize contrasting colors to create impact and focal points. Employ negative space to enhance your composition and direct focus. Finally, manipulate scale and perspective to add depth and interest. By mastering these techniques, you'll transform ordinary aerial shots into enchanting visual stories. The possibilities for creating stunning compositions from above are truly endless.
Key Takeaways
- Leading lines and geometric compositions guide the viewer's eye through the image, creating depth and visual interest.
- The rule of thirds and symmetry help create balanced compositions and captivating focal points in aerial photography.
- Emphasizing repetitive elements and patterns transforms landscapes into visually striking compositions, adding depth and appeal.
- Natural frames draw attention to the main subject, using landscape features like mountains and rivers as effective framing elements.
- Contrasting colors and color theory enhance the impact of aerial photographs, creating natural focal points and visual storytelling.
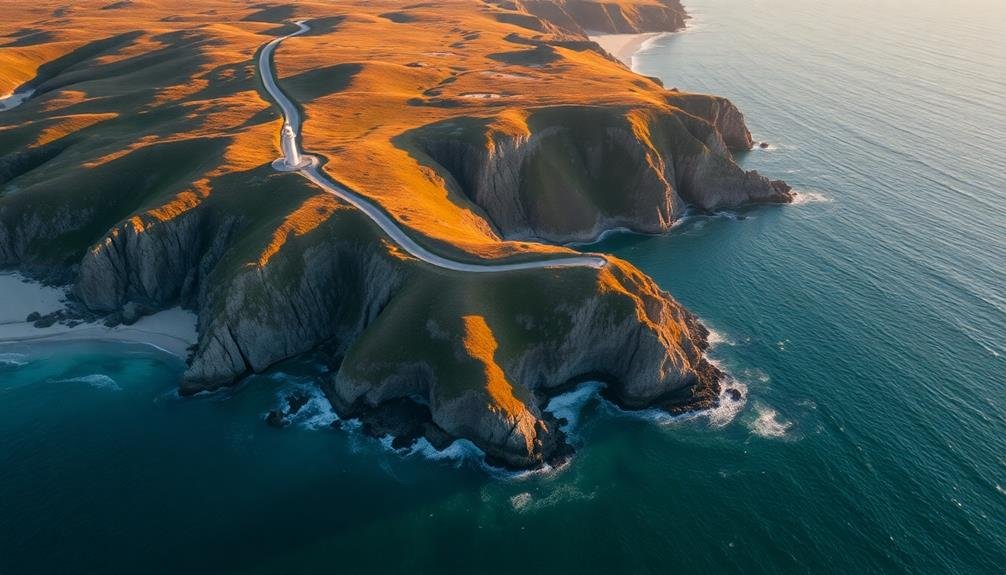
Leading Lines in Aerial Shots

Harnessing the power of leading lines in aerial photography can transform an ordinary shot into a visually compelling masterpiece. When you're capturing images from above, look for natural or man-made features that create strong linear elements. These can include roads, rivers, coastlines, or even rows of crops in fields.
To effectively use leading lines, position your drone or aircraft to align these linear elements with your intended focal point. This technique guides the viewer's eye through the image, creating a sense of depth and direction.
You'll want to experiment with different angles and altitudes to find the most impactful composition. Consider the direction of your leading lines. Diagonal lines often create a sense of dynamism, while curved lines can add a softer, more organic feel to your image.
Don't forget about vertical lines, which can emphasize height and scale in your aerial shots.
Rule of Thirds From Above
The Rule of Thirds, a fundamental principle in photography, takes on a unique dimension when applied to aerial shots. From above, you'll find that dividing your frame into a 3×3 grid creates powerful compositional possibilities. As you frame your shot, place key elements along these lines or at their intersections to create a balanced and visually appealing image.
When shooting landscapes from the air, you can use this technique to emphasize the horizon. Place it along the upper or lower third line, depending on whether you want to highlight the sky or the ground.
For urban scenes, align buildings or roads with the vertical lines to create a sense of order and structure.
You'll find that the Rule of Thirds works exceptionally well for aerial photography of coastlines, rivers, or highways. Position these linear features along the grid lines to lead the viewer's eye through the image.
Remember, you don't always have to follow this rule strictly. Sometimes, placing your subject slightly off the intersections can create tension and interest in your composition.
As you practice, you'll develop an intuitive sense of when to apply or break this rule for maximum impact in your aerial shots.
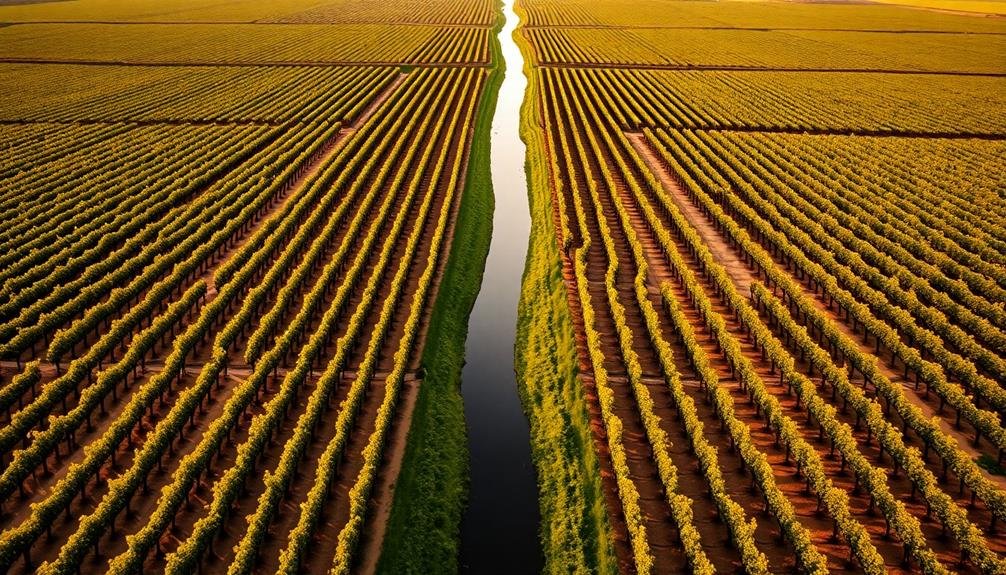
Symmetry and Patterns in Landscapes
When capturing aerial photographs, you'll often encounter natural symmetry in landscapes that can create stunning focal points.
You can enhance these symmetrical elements by framing your shots to create geometric compositions, such as perfect squares or triangles.
Don't forget to look for repetitive patterns in fields, forests, or urban areas, as emphasizing these recurring elements can add depth and interest to your aerial images.
Identifying Natural Symmetry
Nature's symmetry offers aerial photographers a wealth of enchanting subjects. When you're scanning the landscape from above, you'll notice that symmetry often appears in unexpected places. Rivers and their tributaries create mirror-like patterns, while coastlines can form near-perfect curves.
Look for geological formations that repeat themselves, such as mountain ranges or sand dunes that seem to echo one another.
You'll find symmetry in both natural and man-made elements. Forests may display a uniform canopy, broken only by clearings or lakes. Agricultural fields often present a patchwork of geometric shapes, especially when viewed from high altitudes.
Even urban areas can reveal surprising symmetry in their layout of streets and buildings.
To capture these symmetrical patterns effectively, position your camera directly above the subject when possible. This bird's-eye view will emphasize the balanced nature of the landscape. Use a wide-angle lens to encompass more of the scene, and consider including an asymmetrical element to create visual interest.
Creating Geometric Compositions
Building on the concept of natural symmetry, you can take your aerial photography to the next level by actively creating geometric compositions. Look for opportunities to frame your shots with strong lines, shapes, and patterns that emerge from the landscape below. These elements can guide the viewer's eye and create a sense of order within your images.
To create compelling geometric compositions, consider these techniques:
- Use roads, rivers, or coastlines as leading lines to draw attention to your focal point.
- Capture agricultural fields or urban grids to form repeating patterns and textures.
- Incorporate circular elements like roundabouts, lakes, or stadiums to break up linear patterns and add visual interest.
When composing your shot, pay attention to the rule of thirds and try to place key elements along these imaginary lines or at their intersections.
Don't be afraid to adjust your altitude or angle to achieve the perfect geometric balance. Remember, contrast is essential in emphasizing shapes and patterns, so look for areas where light and shadow interact dramatically.
Emphasizing Repetitive Elements
Repetitive elements in aerial photography can transform ordinary landscapes into enchanting works of art. When you're capturing scenes from above, look for symmetry and patterns that naturally occur in both urban and rural settings. Fields, orchards, and forests often display striking geometric patterns when viewed from the air. In cities, rows of buildings, parking lots, and road networks create engaging repetitive elements.
To emphasize these patterns in your compositions:
| Technique | Effect | Example |
|---|---|---|
| Use leading lines | Draws the eye | Rows of crops |
| Frame symmetrically | Creates balance | Mirrored buildings |
| Highlight contrast | Enhances patterns | Light vs. dark surfaces |
Don't be afraid to zoom in on specific areas to isolate particularly interesting repetitive elements. You'll often find that abstract compositions can be more impactful than wider shots. Play with different altitudes to see how patterns change and reveal themselves at various heights. Remember, timing is essential – shadows can accentuate or diminish patterns depending on the sun's position, so plan your shoots accordingly. By focusing on repetitive elements, you'll create visually striking aerial photographs that engage viewers and showcase the hidden beauty of landscapes from above.
Natural Frames in Aerial Photography
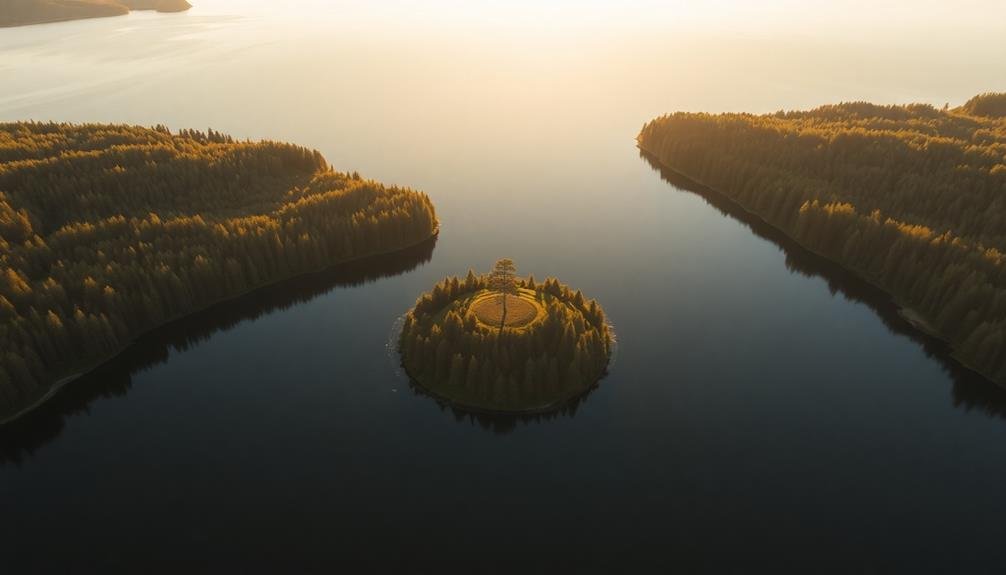
Soaring above landscapes, aerial photographers can leverage natural frames to create enchanting compositions. Natural frames in aerial photography are elements within the scene that surround or partially enclose your main subject, drawing the viewer's eye to the focal point. These frames can be formed by various landscape features, such as mountains, rivers, or forests.
To effectively use natural frames in your aerial shots:
- Look for circular or arc-shaped elements like curved coastlines, circular lakes, or winding rivers that can wrap around your subject.
- Seek out contrasting colors or textures that create a frame-like effect, such as a dark forest surrounding a bright meadow.
- Utilize negative space in clouds or snow to frame a landscape feature below.
When you've identified potential natural frames, position your aircraft or drone to align the frame with your intended subject.
You'll want to experiment with different altitudes and angles to find the perfect balance between the frame and the focal point.
Remember, the frame shouldn't overpower the subject but rather complement and enhance it.
Contrasting Colors for Visual Impact

When you're capturing aerial photographs, understanding color theory can greatly enhance your images' impact.
You'll find that vibrant colors often draw the viewer's eye, creating natural focal points in your compositions.
However, don't overlook the power of muted tones, as they can provide a subtle contrast that adds depth and sophistication to your aerial shots.
Color Theory in Aerials
From high above, color theory takes on a new dimension in aerial photography. You'll find that colors blend and interact differently when viewed from an aerial perspective, creating unique opportunities for striking compositions.
Understanding how colors work together can help you create more impactful and visually appealing aerial shots.
When composing your aerial photographs, consider the following color relationships:
- Complementary colors: Seek out scenes where opposite colors on the color wheel, like blue and orange or green and red, appear side by side. These pairings create vibrant contrast and draw the viewer's eye.
- Analogous colors: Look for landscapes with colors that sit next to each other on the color wheel, such as green, yellow-green, and yellow. This creates a harmonious and cohesive feel in your images.
- Monochromatic schemes: Capture scenes dominated by variations of a single color, like different shades of blue in an ocean landscape. This approach can create a sense of calm and unity in your photographs.
Vibrant vs. Muted Tones
The interplay between vibrant and muted tones can dramatically affect the visual impact of your aerial photographs. When composing your shots, consider how contrasting colors can draw the viewer's eye to specific focal points.
Vibrant colors, such as bright reds, yellows, and blues, naturally attract attention. Use these to highlight key elements in your composition. For instance, a vivid red roof amidst a sea of muted gray buildings can create a striking focal point.
Conversely, muted tones can provide a calming backdrop, allowing vibrant elements to stand out even more. Don't shy away from using both vibrant and muted tones in the same image. This contrast can create depth and visual interest. For example, a lush green forest against a pale, sandy beach can produce a fascinating juxtaposition.
Remember, the time of day and lighting conditions will affect color intensity. Golden hour can enhance warm tones, while overcast skies can mute colors. Experiment with different lighting conditions to achieve your desired balance of vibrant and muted tones.
In post-processing, you can fine-tune color saturation to emphasize certain areas or create a specific mood. However, be careful not to overdo it, as excessive saturation can look unnatural and detract from your composition's overall impact.
Negative Space in Drone Compositions

Mastering negative space can elevate your drone photography from ordinary to extraordinary. When you're capturing aerial shots, embrace the vast emptiness around your subject to create powerful compositions. Negative space isn't just empty; it's a tool that directs the viewer's eye and enhances your focal point.
Use negative space to your advantage by:
- Framing a lone object against an expansive sky or ocean, emphasizing its isolation.
- Capturing geometric patterns in fields or urban landscapes, letting empty areas accentuate shapes.
- Highlighting scale by juxtaposing a small subject against a vast, empty backdrop.
You'll find that negative space adds depth and context to your images. It's not about filling the frame, but about strategic placement.
When you're composing your shot, consider the balance between your subject and the surrounding emptiness. Don't be afraid to let your subject occupy only a small portion of the image. The contrast between the filled and empty areas creates tension and interest.
Scale and Perspective Manipulation
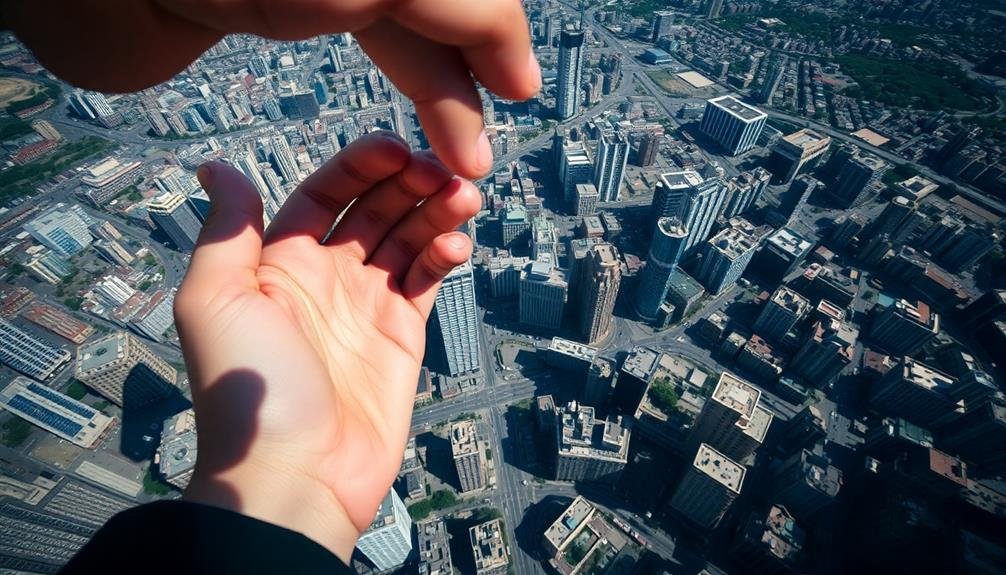
While negative space creates impact, manipulating scale and perspective takes your drone photography to new heights. By flying at different altitudes and angles, you can alter the viewer's perception of size and distance, creating striking and sometimes surreal images.
To play with scale, try capturing familiar objects from unusual heights. A bird's-eye view of cars, people, or buildings can make them appear toy-like and miniature. Conversely, flying low over small objects can make them seem larger than life. Experiment with juxtaposing differently sized elements to create visual tension and interest.
Perspective manipulation involves changing the angle of your drone's camera. Tilt it downward for a top-down view that flattens landscapes into abstract patterns. Alternatively, angle it slightly to create dynamic diagonals or leading lines. You can also use the drone's mobility to capture impossible perspectives, like looking straight down a tall building or peering into normally inaccessible areas.
Remember to reflect on the time of day when shooting. Long shadows at sunrise or sunset can dramatically enhance the sense of scale and depth in your aerial compositions.
Frequently Asked Questions
How Do Weather Conditions Affect Focal Point Selection in Aerial Photography?
Weather conditions greatly impact your focal point selection in aerial photography. You'll need to adapt to visibility, lighting, and cloud patterns. Clear skies offer more options, while overcast conditions may limit your choices or create unique opportunities.
What's the Best Drone Altitude for Capturing Effective Focal Points?
For effective focal points, you'll want to fly your drone between 100-400 feet. At this altitude, you can capture detailed subjects while maintaining context. Experiment with different heights to find the perfect balance for your shot.
How Can Dynamic Subjects Be Used as Focal Points in Aerial Shots?
You can use dynamic subjects as focal points in aerial shots by tracking moving vehicles, boats, or wildlife. Follow their motion, create contrast with surroundings, and capture them at interesting moments to draw viewers' attention effectively.
Are There Legal Restrictions on Using Certain Landmarks as Focal Points?
Yes, you'll face legal restrictions when using certain landmarks as focal points. You can't photograph some government buildings, military installations, or private properties. Always check local laws and obtain necessary permits before your aerial shoot.
How Does Time of Day Impact the Effectiveness of Focal Points?
Time of day greatly affects your focal points' effectiveness. You'll find early morning and late afternoon offer softer light, enhancing contrast and creating long shadows. Midday sun can wash out details, so you'll need to adjust your approach.
In Summary
You've now got a toolkit of powerful techniques to elevate your aerial photography. By mastering leading lines, the rule of thirds, symmetry, framing, color contrast, negative space, and scale manipulation, you'll create stunning compositions that captivate viewers. Remember, these aren't rigid rules but guidelines to spark your creativity. Experiment with different approaches, and don't be afraid to break conventions. With practice, you'll develop your unique style and capture breathtaking aerial shots that truly stand out.
As educators and advocates for responsible drone use, we’re committed to sharing our knowledge and expertise with aspiring aerial photographers.


Leave a Reply