To capture stunning sky photographs, you'll need to master essential lighting techniques. Start by shooting during golden and blue hours for ideal light. Use exposure compensation to balance bright skies with darker foregrounds. Experiment with graduated ND filters and long exposures for dramatic effects. Try HDR techniques to capture a wider range of tones. Create impactful sunbursts by using small apertures, and leverage silhouettes for contrast. Don't shy away from diverse weather conditions; they can yield unique shots. Finally, enhance your sky photos in post-processing to make colors pop. These tips are just the beginning of your journey to breathtaking sky imagery.
Key Takeaways
- Shoot during golden and blue hours for soft, warm light and dramatic colors in the sky.
- Use exposure compensation to balance bright skies and preserve cloud details.
- Employ filters like graduated ND and polarizers to enhance sky colors and balance exposures.
- Experiment with long exposures to capture cloud movement and create ethereal effects.
- Utilize post-processing techniques to enhance sky details, adjust colors, and balance exposures.
Understand Golden and Blue Hours
Mastering the art of sky photography begins with understanding the golden and blue hours. These magical times of day offer unique lighting conditions that can transform your sky shots from ordinary to extraordinary.
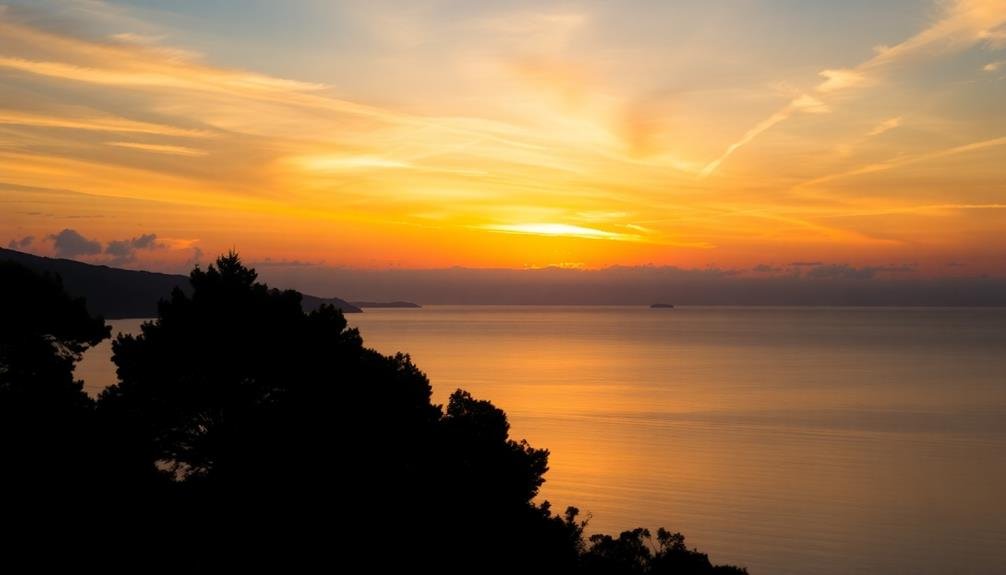
The golden hour occurs shortly after sunrise and before sunset when the sun is low on the horizon. During this time, the light is soft, warm, and diffused, casting a golden glow across the landscape. It's ideal for capturing dramatic skies with rich, warm colors and long shadows that add depth to your images.
The blue hour happens just before sunrise and after sunset when the sun is below the horizon. This period bathes the sky in cool, blue tones and creates a serene atmosphere. It's perfect for capturing cityscapes with twinkling lights or peaceful landscapes with an ethereal quality.
To make the most of these times, plan your shoots in advance. Use apps or websites to determine exact golden and blue hour times for your location.
Arrive early to set up your equipment and compose your shots. Experiment with different exposures to capture the changing light conditions. Don't forget to bring a tripod for stability during longer exposures in low light.
Master Exposure Compensation

When photographing skies, you'll often encounter scenes where the sky is notably brighter than the foreground.
To compensate for this, you'll need to adjust your camera's exposure compensation settings. By reducing the exposure, you can preserve cloud details and prevent the sky from appearing washed out, ensuring a more balanced and enchanting image.
Adjust for Bright Skies
The art of adjusting for bright skies is essential in sky photography. When faced with a bright sky, your camera's automatic metering system often struggles to capture the full range of light, resulting in overexposed skies or underexposed foregrounds. To combat this, you'll need to make manual adjustments.
Start by using your camera's spot metering mode to measure the sky's brightness. Then, underexpose your shot by 1-2 stops to preserve the sky's details. You can achieve this by adjusting your shutter speed, aperture, or ISO.
Alternatively, use graduated neutral density filters to darken the sky while keeping the foreground properly exposed.
Don't forget about the histogram. It's a valuable tool that shows you the distribution of tones in your image. Aim for a balanced histogram without clipping on either end. If you're shooting in RAW, you'll have more flexibility to recover details in post-processing.
For challenging lighting situations, consider bracketing your exposures. Take multiple shots at different exposure levels and blend them later in post-processing. This technique allows you to capture a wider dynamic range and create stunning, well-balanced sky photographs.
Preserve Cloud Details
Artistry in sky photography hinges on preserving cloud details through expert exposure compensation. When you're faced with a dramatic sky, your camera's automatic settings might wash out intricate cloud formations.
To capture the full range of textures and tones, you'll need to take control of your exposure. Start by switching to manual mode or using exposure compensation in your camera's semi-automatic modes. Aim to slightly underexpose your image, typically by 1/3 to 2/3 stops. This technique helps retain the delicate highlights in the clouds while maintaining overall image balance.
For more precise control, consider these techniques:
- Use spot metering on the brightest part of the sky
- Bracket your exposures to guarantee you capture the full dynamic range
- Employ graduated neutral density filters to balance bright skies with darker foregrounds
Utilize Graduated Neutral Density Filters

One of the most valuable tools in a sky photographer's arsenal is the graduated neutral density filter. These filters help balance the exposure between the bright sky and darker foreground, allowing you to capture stunning sky images without sacrificing detail in either area.
To use a graduated ND filter effectively, position it over your lens so that the darker portion covers the sky while the clear part remains over the landscape. You'll need to adjust the filter's position based on the horizon line in your composition.
Soft-edge filters work well for scenes with irregular horizons, while hard-edge filters are ideal for straight horizon lines.
Start with a 2-stop or 3-stop filter and adjust as needed. You can stack multiple filters for more dramatic effects. When shooting, expose for the foreground to guarantee you capture all the detail in the landscape. The filter will then darken the sky, preventing it from being overexposed.
Remember to clean your filters regularly and handle them with care to avoid scratches.
With practice, you'll find that graduated ND filters become an indispensable tool for creating balanced, visually striking sky photographs.
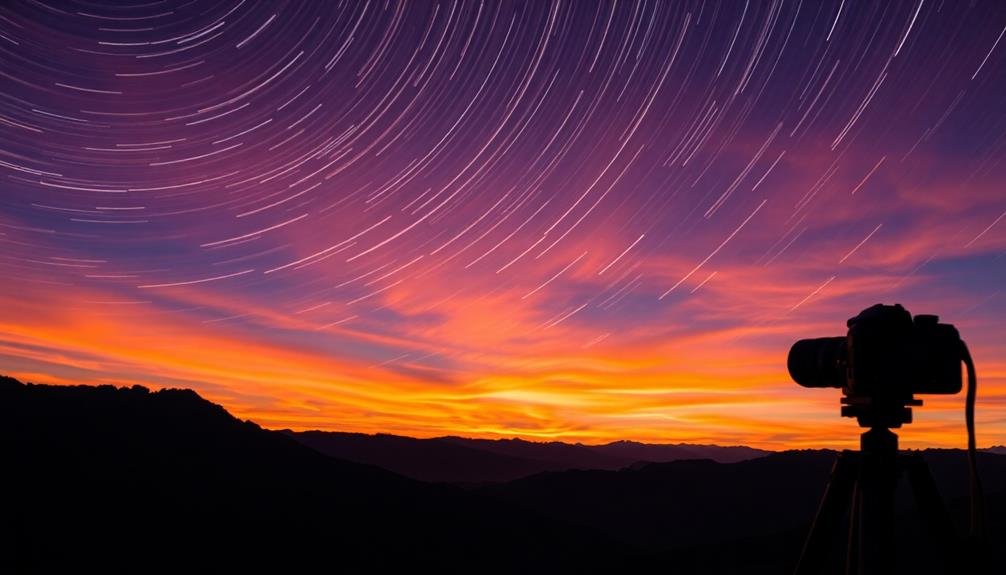
Experiment With Long Exposures

While graduated ND filters help balance exposure, long exposures open up a world of creative possibilities for sky photography. By extending your shutter speed, you'll capture the movement of clouds, stars, and other celestial objects, creating dramatic and ethereal images.
Start by using a sturdy tripod to keep your camera stable during extended exposures. Experiment with shutter speeds ranging from a few seconds to several minutes, depending on the effect you're aiming for.
To achieve stunning long exposure sky photos, consider these techniques:
- Use a remote shutter release or your camera's self-timer to minimize camera shake
- Enable your camera's long exposure noise reduction feature for cleaner images
- Shoot in RAW format to preserve maximum detail and allow for greater post-processing flexibility
When photographing moving clouds, aim for exposures between 30 seconds and 2 minutes to create a smooth, silky effect. For star trails, extend your exposure to 15 minutes or longer.
Remember to adjust your aperture and ISO accordingly to maintain proper exposure. Don't be afraid to push the boundaries and try unconventional settings – you might discover unique and enthralling sky compositions that set your photography apart.
Harness HDR Techniques

High Dynamic Range (HDR) techniques can considerably enhance your sky photography by capturing a wider range of tones and details. To harness HDR, you'll need to take multiple exposures of the same scene, typically three to five shots at different exposure levels. Bracket your exposures, starting with a properly exposed image, then capture underexposed and overexposed versions.
When processing, blend these exposures using HDR software or manual blending techniques in photo editing programs. This allows you to reveal details in both highlights and shadows that a single exposure might miss. Be careful not to overdo the effect, as excessive HDR can lead to unrealistic-looking images.
For best results, use a tripod to guarantee perfect alignment between shots. If you're shooting moving clouds or water, consider using a neutral density filter to lengthen exposure times and create a smoother blending effect.
HDR works particularly well for sunset and sunrise shots, where the sky's brightness often contrasts sharply with darker foreground elements. By mastering HDR techniques, you'll be able to capture the full drama and beauty of the sky in your photographs.
Capture Dramatic Cloud Formations
When capturing dramatic cloud formations, focus on highlighting cloud texture and emphasizing cloud shapes.
You'll want to pay attention to the play of light and shadow across the clouds, which can reveal intricate details and patterns.
Use your camera settings and composition techniques to accentuate the unique structures and forms of the clouds, creating visually striking images that showcase the sky's dynamic nature.
Highlight Cloud Texture
Three key techniques can help you highlight cloud texture and capture dramatic formations in sky photography.
First, use side lighting to your advantage. When the sun is low on the horizon, it casts long shadows across cloud surfaces, revealing intricate details and depth. Position yourself so that the light comes from the side, accentuating the cloud's contours and creating a three-dimensional effect.
Second, employ contrast to make cloud textures pop. Adjust your camera settings to increase the contrast between light and dark areas of the sky. This can be achieved by slightly underexposing your shots or using graduated neutral density filters to balance bright skies with darker foregrounds.
Lastly, experiment with different focal lengths to emphasize cloud patterns. Wide-angle lenses can capture expansive skyscapes, while telephoto lenses allow you to isolate and magnify specific cloud formations.
To further enhance your sky photography:
- Use polarizing filters to deepen blue skies and increase cloud definition
- Shoot in RAW format for greater post-processing flexibility
- Experiment with long exposures to capture cloud movement and create dreamy effects
Emphasize Cloud Shapes
Dramatic cloud formations often serve as the centerpiece of compelling sky photography. To emphasize these shapes, you'll need to master lighting techniques that accentuate their contours and dimensions. Start by positioning yourself to capture the clouds' most interesting angles. Side-lighting from a low sun can create striking shadows and highlights, revealing the clouds' depth and structure.
Use a graduated neutral density filter to balance the exposure between bright skies and darker landscapes, ensuring you don't lose cloud detail. Experiment with longer exposures to capture cloud movement, which can add a sense of drama and flow to your images. For cumulonimbus or anvil-shaped clouds, try underexposing slightly to enhance their imposing nature.
When working with wispy cirrus clouds, overexpose slightly to bring out their delicate patterns. Pay attention to the interplay between clouds and sunlight, especially during golden hour. Backlighting can create stunning silhouettes and rim lighting effects.
Don't forget to take into account the overall composition; use the Rule of Thirds to place cloud formations strategically within your frame. By mastering these techniques, you'll be able to create images that truly showcase the majestic shapes and forms of clouds in the sky.
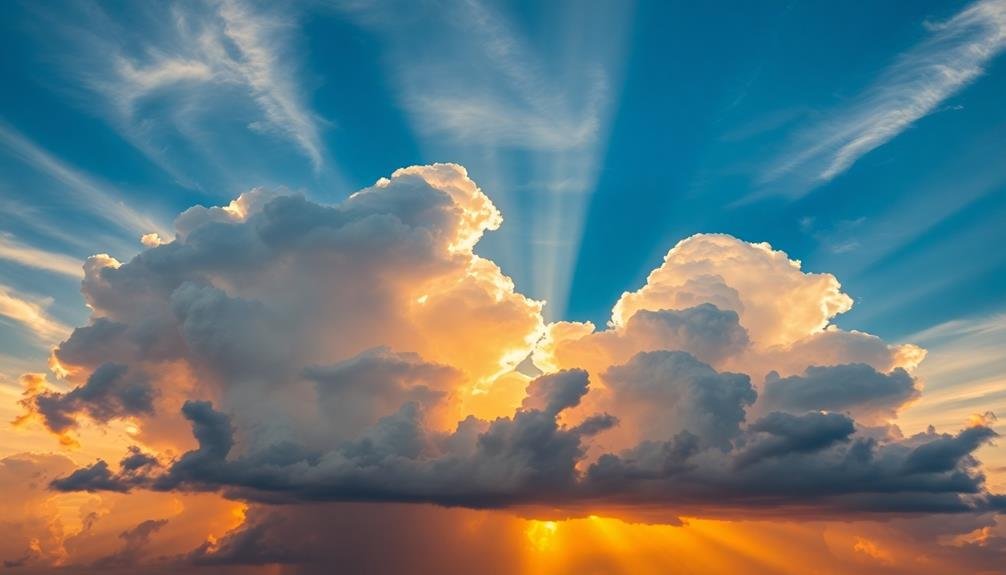
Enhance Sunbursts and Starbursts

Sun rays bursting through clouds or stars twinkling in the night sky can transform an ordinary photo into something magical. To enhance these enchanting effects, you'll need to master a few techniques.
First, use a small aperture (high f-number) to create more defined sunbursts. This narrows the light path, resulting in sharper, more pronounced rays. For starbursts, aim for f/16 or higher.
Timing is essential. Shoot when the sun is partially obscured by an object, like a tree branch or building edge. This creates a more dramatic effect as light diffracts around the obstruction.
For night photography, focus on bright stars or planets to achieve similar results.
To further enhance sunbursts and starbursts:
- Use a tripod to keep your camera steady, especially for longer exposures
- Clean your lens thoroughly to minimize unwanted flare
- Experiment with different focal lengths to vary the intensity of the effect
Don't forget to adjust your camera's exposure settings to prevent overexposure. Use spot metering and expose for the brightest part of the scene, then fine-tune as needed.
With practice, you'll capture stunning sun and star effects that elevate your sky photography to new heights.
Leverage Silhouettes for Impact

To create powerful sky photographs, don't overlook the impact of silhouettes.
You'll want to frame dark foreground objects against the bright sky, creating stark contrasts that draw the viewer's eye.
Remember to expose for the sky's highlights, allowing the foreground elements to become deep, shadowy shapes that add drama and depth to your composition.
Frame Dark Foreground Objects
Against the backdrop of a vibrant sky, dark foreground objects can create striking visual contrast in your photographs. By carefully framing these elements, you'll add depth and interest to your sky images. Look for trees, buildings, or natural formations that can serve as silhouettes against the colorful sky.
When composing your shot, consider the rule of thirds to place your foreground objects strategically. You'll want to guarantee they don't overpower the sky but rather complement it. Experiment with different angles and positions to find the most compelling arrangement.
To enhance the impact of framed dark foreground objects:
- Use a narrow aperture (high f-number) to keep both the foreground and sky in focus
- Underexpose slightly to deepen the silhouette and enhance sky colors
- Try incorporating leading lines to draw the viewer's eye through the image
Remember to keep your camera steady, especially in low light conditions. A tripod can be invaluable for achieving sharp images.
Expose for Sky Highlights
When capturing dramatic skies, exposing for the highlights is key to preserving the sky's vibrant colors and details. To achieve this, use your camera's spot metering mode and aim at the brightest part of the sky. This technique guarantees you won't overexpose the highlights, which can result in washed-out areas with lost information.
As you expose for the sky, you'll notice that foreground elements may become dark or even silhouetted. Don't worry—this can actually enhance your composition. Silhouettes add depth and interest to your sky photos, creating striking contrasts between the luminous sky and dark shapes.
To make the most of this technique, look for interesting foreground elements with recognizable shapes. Trees, buildings, or people can create compelling silhouettes against a vibrant sky. Position these elements carefully within your frame to achieve balance and guide the viewer's eye.
If you find the foreground is too dark, consider using graduated neutral density filters or bracketing your shots for later blending in post-processing. This allows you to maintain the sky's drama while retaining some detail in the foreground, giving you more flexibility in your final image.
Embrace Weather Conditions

How often have you missed out on great sky photography opportunities due to less-than-ideal weather?
It's time to change your perspective and embrace various weather conditions for unique and enchanting sky shots. Different weather patterns can add drama, texture, and atmosphere to your images, creating compelling visual stories.
Don't limit yourself to clear, sunny days. Overcast skies can provide soft, even lighting for landscape photography, while stormy conditions offer dramatic cloud formations and intense colors.
Fog and mist can create ethereal, moody scenes that evoke a sense of mystery. Even rain can be an asset, producing reflections and adding a dynamic element to your compositions.
To make the most of diverse weather conditions:
- Always be prepared with weather-appropriate gear for your camera
- Study weather forecasts to anticipate interesting sky phenomena
- Experiment with different exposure settings to capture the mood accurately
Post-Process for Sky Enhancement

While capturing stunning sky photos in various weather conditions is a great start, post-processing can elevate your images to new heights.
Begin by adjusting the exposure and contrast to bring out the sky's details. Use the highlights and shadows sliders to balance the brightness between the sky and foreground elements. Don't be afraid to experiment with the clarity and dehaze tools to enhance cloud definition and reduce atmospheric haze.
Color adjustments are essential for sky enhancement. Fine-tune the white balance to achieve natural-looking colors, and use selective color adjustments to emphasize specific hues in the sky. The graduated filter tool can help balance exposure between the sky and land, creating a more harmonious composition.
For dramatic skies, try using HDR techniques or luminosity masking to blend multiple exposures. This approach allows you to capture a wider dynamic range and reveal intricate details in both bright and dark areas.
Frequently Asked Questions
What Camera Settings Are Best for Capturing the Milky Way?
You'll want to use a wide aperture (f/2.8 or wider), high ISO (3200-6400), and long exposure (20-30 seconds). Use manual focus, a sturdy tripod, and a wide-angle lens for best results capturing the Milky Way.
How Do I Prevent Lens Flare When Photographing the Sun?
To prevent lens flare when photographing the sun, you'll want to use a lens hood, clean your lens thoroughly, and avoid shooting directly at the sun. You can also try using filters or changing your composition slightly.
Can I Use Artificial Light Sources to Illuminate Foreground Elements?
Yes, you can use artificial light sources to illuminate foreground elements. You'll want to experiment with flashlights, LED panels, or strobes. Try different angles and intensities to create depth and balance with the sky's natural light.
What's the Ideal Focal Length for Wide-Angle Sky Photography?
For wide-angle sky photography, you'll want to use a focal length between 14mm and 24mm. This range allows you to capture expansive scenes while maintaining sharpness. Don't forget to experiment with different focal lengths for varied perspectives.
How Do I Plan Shots Around Specific Celestial Events?
To plan shots around celestial events, you'll need to research upcoming occurrences, use astronomy apps for precise timing, scout locations in advance, and prepare your gear. Don't forget to check weather forecasts and practice your nighttime shooting skills.
In Summary
You've now got the tools to capture breathtaking sky photos. Remember, timing is essential, so plan your shoots around golden and blue hours. Don't be afraid to experiment with exposure, filters, and long exposures. Embrace challenging weather and use silhouettes to add drama. In post-processing, enhance your sky's colors and details. With practice, you'll soon be creating stunning sky images that'll leave viewers in awe. Keep shooting and exploring the endless possibilities above!
As educators and advocates for responsible drone use, we’re committed to sharing our knowledge and expertise with aspiring aerial photographers.


Leave a Reply