
You'll achieve superior aerial imagery accuracy by mastering these 10 essential georeferencing techniques. Start with Ground Control Points (GCPs) for precise alignment. Utilize Real-Time Kinematic (RTK) and Post-Processed Kinematic (PPK) methods for centimeter-level precision. Integrate onboard GNSS receivers for enhanced positioning. Employ automated tie point generation and image feature matching algorithms to streamline processing. Apply orthorectification to correct distortions, and leverage multi-sensor data fusion for thorough results. Perfect your aerial triangulation adjustment skills, and don't forget terrain-based feature matching. By implementing these strategies, you'll elevate your georeferencing game and access new levels of accuracy in your aerial imagery projects.
Key Takeaways
- Ground Control Points (GCPs) are essential for aligning aerial imagery with real-world locations, aiming for 5-10 GCPs per image.
- Real-Time Kinematic (RTK) positioning provides centimeter-level accuracy, reducing or eliminating the need for GCPs in many cases.
- Post-Processed Kinematic (PPK) technique processes GPS data after flight for high-precision georeferencing, ideal for areas with poor radio connectivity.
- Automated tie point generation identifies and matches common points across overlapping images, speeding up the georeferencing workflow.
- Orthorectification corrects geometric distortions in aerial imagery, addressing terrain relief displacement, lens distortion, and camera tilt for improved accuracy.
Ground Control Points (GCPs)
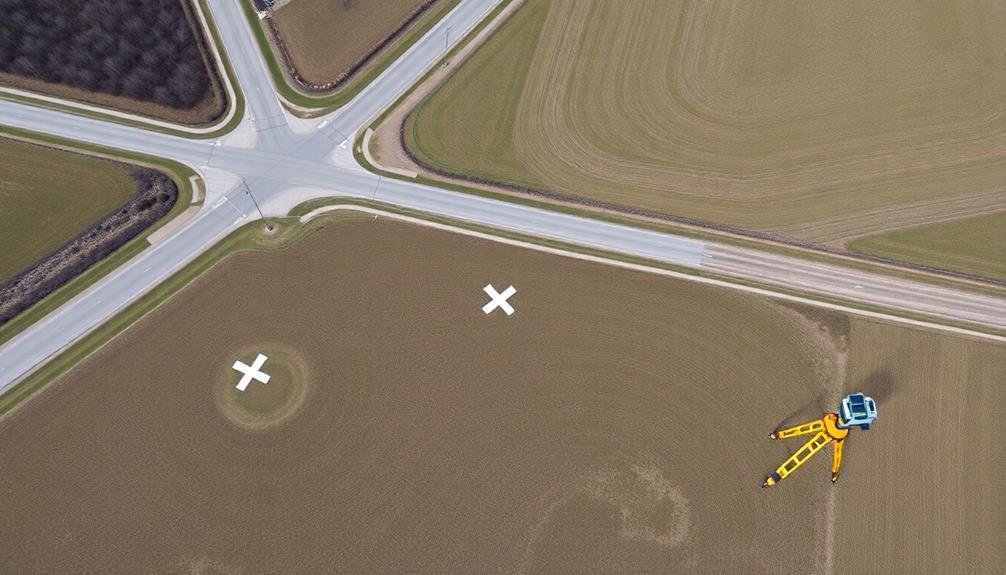
In the early stages of georeferencing aerial imagery, Ground Control Points (GCPs) play an essential role. These are identifiable features on the ground with known coordinates that you'll use to align your aerial images with their real-world locations.
To maximize accuracy, you'll want to select GCPs that are easily visible in your imagery and well-distributed across the area of interest.
When collecting GCPs, you'll typically use high-precision GPS equipment to record their exact coordinates. It's vital to gather more GCPs than you think you'll need, as some may be obscured or unusable in your final imagery. Aim for at least 5-10 GCPs per image, depending on the size and complexity of your area.
Once you've collected your GCPs, you'll use them in your georeferencing software to transform your aerial imagery. This process involves matching the GCP locations in your images to their known real-world coordinates.
The software will then calculate the necessary adjustments to align your imagery correctly. Remember, the quality and distribution of your GCPs directly impact the accuracy of your final georeferenced product.
Real-Time Kinematic (RTK) Positioning
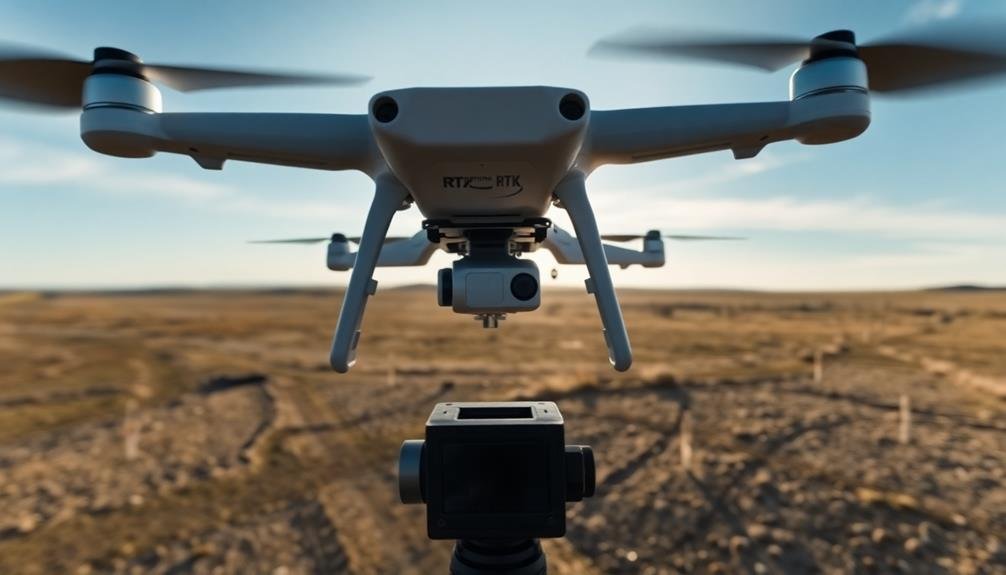
Precision is the hallmark of Real-Time Kinematic (RTK) positioning in aerial imagery georeferencing. This technique uses a base station and a rover receiver to provide real-time corrections to GPS data, resulting in centimeter-level accuracy. You'll find RTK particularly useful for projects requiring high-precision mapping and surveying.
When you're using RTK for aerial imagery, your drone will be equipped with an RTK-enabled GPS receiver. This receiver communicates with a ground-based station or network to receive correction data. As you fly, the drone's position is continuously updated and refined, ensuring that each captured image is tagged with highly accurate location data.
You'll notice significant improvements in your georeferencing results with RTK. It reduces or eliminates the need for ground control points in many cases, saving you time and resources. RTK also enhances the consistency of your data across large areas, minimizing distortions and improving the overall quality of your orthomosaics and 3D models.
However, you should be aware that RTK requires a clear line of sight to satellites and a reliable data link between the base and rover. It's also more expensive than standard GPS solutions, but the benefits often outweigh the costs for high-precision applications.
Post-Processed Kinematic (PPK) Technique

Offering an alternative to real-time corrections, Post-Processed Kinematic (PPK) technique provides high-precision georeferencing for aerial imagery.
You'll find that PPK processes GPS data after your flight, allowing for greater flexibility in your aerial survey operations.
With PPK, you don't need a constant radio link to a base station during the flight. Instead, you'll collect raw GPS data from both the drone and a ground base station.
After the mission, you'll use specialized software to combine this data, applying corrections to achieve centimeter-level accuracy.
You'll appreciate PPK's advantages in areas with poor radio connectivity or when working far from established base stations.
It's particularly useful for large-scale mapping projects where real-time corrections might be challenging.
To implement PPK, you'll need a drone equipped with a PPK-capable GPS receiver, a ground base station, and post-processing software.
You'll also want to guarantee proper mission planning and execution, including maintaining good satellite visibility and minimizing obstructions.
While PPK requires additional post-flight processing time, you'll often find it delivers more reliable results than RTK in challenging environments.
Onboard GNSS Receiver Integration

Moving from post-processing methods, let's explore the integration of GNSS receivers directly onboard the drone. This technique enhances real-time positioning accuracy during aerial surveys. You'll find that modern drones often come equipped with built-in GNSS receivers, capable of logging precise location data for each captured image.
These onboard receivers can utilize multiple satellite constellations, including GPS, GLONASS, and Galileo, to improve accuracy and reliability. They're designed to record the exact position and orientation of the drone at the moment of image capture. This data is then embedded into the image metadata, streamlining the georeferencing process.
You'll benefit from reduced post-processing time and improved efficiency in your workflow. The integration allows for immediate quality checks in the field, enabling you to identify and address any coverage gaps or issues on-site.
However, it's crucial to recognize that the accuracy of onboard GNSS receivers can be affected by factors such as signal obstruction, multipath errors, and atmospheric conditions. To maximize precision, you should still consider using ground control points or RTK/PPK corrections in conjunction with onboard GNSS data.
Automated Tie Point Generation
Explore the domain of automated tie point generation, an essential step in the georeferencing process for aerial imagery. This technique involves identifying and matching common points across multiple overlapping images to create a network of tie points.
You'll find that modern software employs advanced algorithms to detect distinct features in images, such as corners, edges, or unique patterns. As you investigate this process, you'll notice that Scale-Invariant Feature Transform (SIFT) and Speeded Up Robust Features (SURF) are popular algorithms used for feature detection.
These methods enable the software to identify tie points regardless of image scale, rotation, or illumination changes. Once features are detected, the software matches them across images using techniques like nearest neighbor search or random sample consensus (RANSAC).
You'll appreciate how automated tie point generation considerably speeds up the georeferencing workflow. It reduces manual labor and improves accuracy by generating thousands of tie points in minutes.
However, you should always review and refine the results, as automated systems can sometimes produce errors in challenging scenarios, such as areas with repetitive patterns or low contrast. By combining automated generation with manual verification, you'll achieve ideal results in your aerial imagery georeferencing projects.
Digital Elevation Model (DEM) Incorporation
You'll find that incorporating Digital Elevation Models (DEMs) into your georeferencing process greatly enhances terrain accuracy.
By integrating elevation data, you're able to account for variations in landscape topography that can affect image positioning.
This integration allows you to create more precise orthophotos and improve the overall spatial accuracy of your aerial imagery.
Terrain Accuracy Improvement
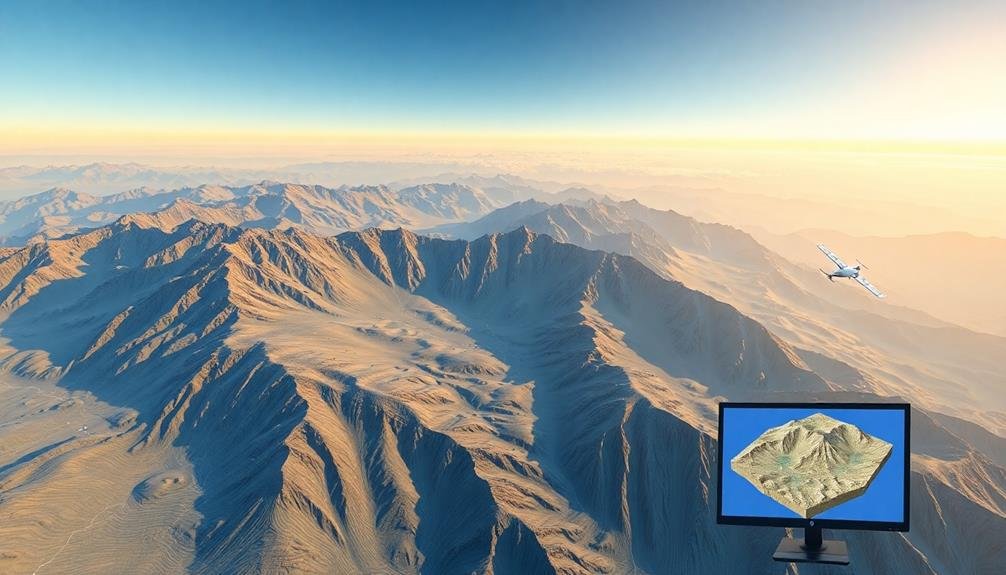
How can we enhance the accuracy of georeferenced aerial imagery when dealing with varied terrain? You'll need to focus on improving terrain accuracy through advanced DEM incorporation techniques.
Start by using high-resolution DEMs that match or exceed the resolution of your aerial imagery. This will provide a more detailed representation of the terrain's topography.
Next, apply orthorectification to your imagery using the DEM. This process corrects distortions caused by terrain variations and camera tilt, resulting in a more accurate representation of ground features.
You should also consider using multiple DEMs for different elevation ranges within your study area, as this can improve accuracy in regions with significant elevation changes.
Implement terrain-based feature matching algorithms to refine the georeferencing process. These algorithms identify and match distinct terrain features between your imagery and the DEM, improving overall alignment.
Don't forget to account for seasonal variations in vegetation and snow cover, which can affect terrain appearance.
Elevation Data Integration
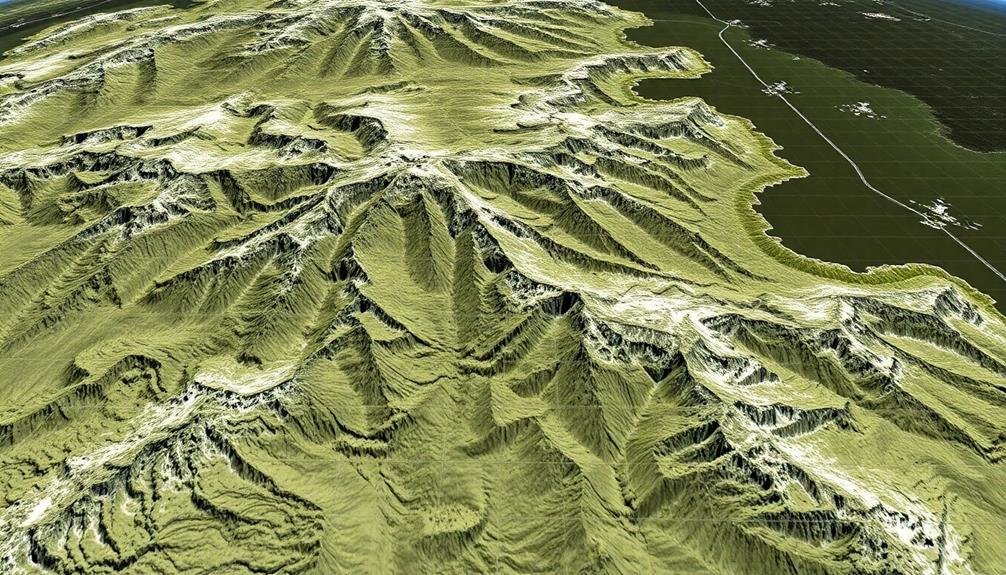
Integrating elevation data through Digital Elevation Model (DEM) incorporation is an important step in enhancing the accuracy of georeferenced aerial imagery. You'll find that DEMs provide vital three-dimensional information about the terrain, allowing for more precise positioning and orthorectification of aerial images.
By incorporating DEM data, you're able to account for topographic variations that can greatly impact the geometric accuracy of your georeferenced imagery.
When integrating elevation data, you should consider the following:
- DEM resolution: Higher resolution DEMs offer more detailed terrain information, improving overall accuracy
- DEM source: Choose a reliable and up-to-date DEM source that matches your project's requirements
- Vertical datum consistency: Verify your DEM's vertical datum aligns with your project's coordinate system
- DEM interpolation methods: Select appropriate interpolation techniques to fill gaps in elevation data
You'll need to carefully align the DEM with your aerial imagery, using ground control points and automated matching algorithms.
This process helps correct distortions caused by terrain variations and camera tilt. By effectively integrating elevation data, you'll achieve more accurate georeferencing results, leading to improved spatial analysis, mapping, and decision-making capabilities in various applications such as urban planning, environmental monitoring, and disaster response.
Image Feature Matching Algorithms
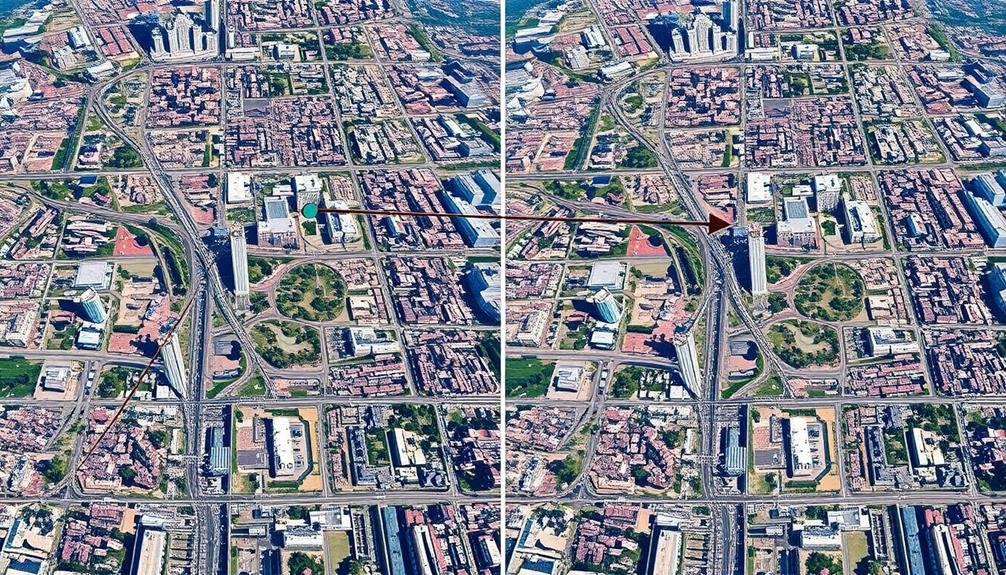
Image feature matching algorithms form the backbone of modern georeferencing techniques for aerial imagery. These algorithms identify and match distinct features across multiple images or between images and reference data.
You'll find that the most common approaches include Scale-Invariant Feature Transform (SIFT), Speeded Up Robust Features (SURF), and Oriented FAST and Rotated BRIEF (ORB).
When you're working with aerial imagery, you'll want to evaluate the strengths of each algorithm. SIFT excels at handling scale and rotation variations but can be computationally intensive. SURF offers faster performance while maintaining good accuracy. ORB provides a balance between speed and effectiveness, making it suitable for real-time applications.
To improve your georeferencing results, you should implement a robust outlier detection method, such as Random Sample Consensus (RANSAC). This will help you eliminate incorrect feature matches.
You'll also want to use a bundle adjustment technique to refine the estimated camera positions and 3D point locations simultaneously. By combining these approaches, you'll achieve more accurate and reliable georeferencing for your aerial imagery projects.
Orthorectification Process
In the orthorectification process, you'll need to address geometric distortions in aerial imagery.
You'll use digital elevation models (DEMs) to correct for terrain-induced displacements and camera tilt effects.
Correcting Geometric Distortions
The orthorectification process tackles several geometric distortions inherent in aerial imagery. You'll need to address these distortions to create accurate, map-like representations of the Earth's surface. The process involves correcting for terrain relief displacement, lens distortion, camera tilt, and atmospheric refraction.
To correct geometric distortions effectively, you'll use a combination of techniques:
- Digital elevation models (DEMs): These provide the necessary topographic information to adjust for terrain-induced distortions.
- Sensor calibration data: This helps account for lens distortions specific to the camera used.
- Ground control points (GCPs): These known reference points on the ground improve overall accuracy.
- Mathematical algorithms: Complex calculations transform the distorted image to its corrected form.
You'll start by identifying and marking GCPs in your imagery. Next, you'll apply the DEM to adjust for terrain variations. Using sensor calibration data, you'll correct for lens distortions.
Digital Elevation Models
Digital elevation models (DEMs) play an essential role in the orthorectification process. They provide vital information about the terrain's topography, allowing you to correct for relief displacement in aerial imagery.
When you're working with DEMs, you'll need to guarantee they've sufficient resolution and accuracy to match your project requirements.
To incorporate DEMs into your georeferencing workflow, you'll first need to acquire or create a suitable model for your area of interest. You can obtain DEMs from various sources, including LiDAR data, photogrammetric techniques, or existing databases.
Once you have your DEM, you'll use it in conjunction with your camera model and ground control points to adjust the imagery.
During the orthorectification process, you'll apply the DEM data to warp the image, effectively "draping" it over the terrain model. This step corrects for distortions caused by elevation changes and guarantees that each pixel in your final orthorectified image is in its proper geographic position.
Remember that the quality of your DEM directly impacts the accuracy of your georeferenced imagery, so it's vital to use the most up-to-date and precise elevation data available.
Multi-Sensor Data Fusion
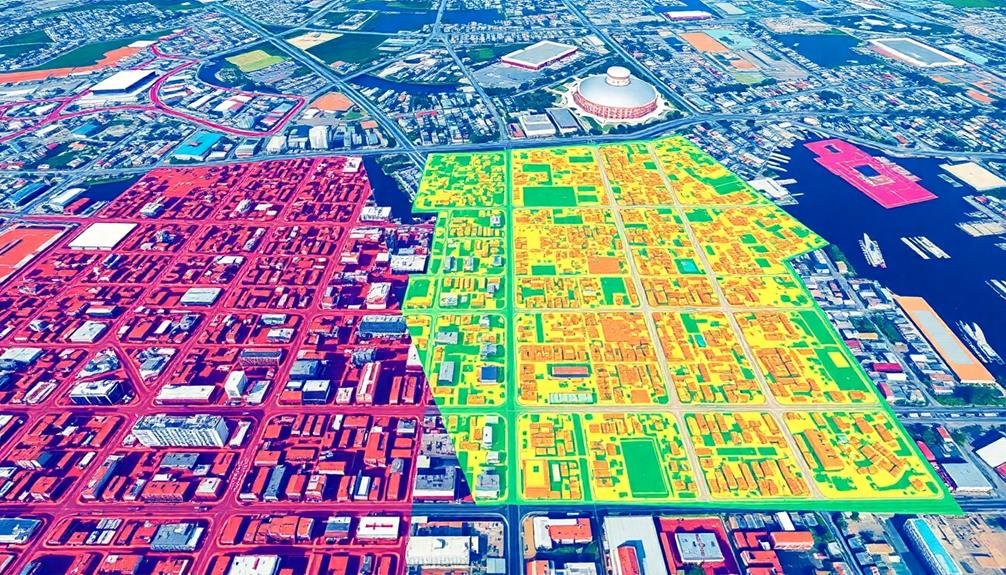
Synergy lies at the heart of multi-sensor data fusion in georeferencing aerial imagery. By combining data from multiple sources, you'll achieve more accurate and thorough results than any single sensor could provide. This technique allows you to leverage the strengths of various sensors while mitigating their individual weaknesses.
When implementing multi-sensor data fusion, you'll typically integrate information from:
- Optical cameras
- LiDAR systems
- GPS/GNSS receivers
- Inertial measurement units (IMUs)
Each sensor contributes unique data, enhancing the overall georeferencing process. For instance, optical cameras provide high-resolution visual information, while LiDAR offers precise 3D point clouds. GPS/GNSS data supplies absolute positioning, and IMUs contribute attitude and motion data.
You'll need to carefully calibrate and synchronize these sensors to guarantee ideal fusion results. Advanced algorithms, such as Kalman filters or machine learning techniques, can help you integrate the diverse data streams effectively.
Aerial Triangulation Adjustment
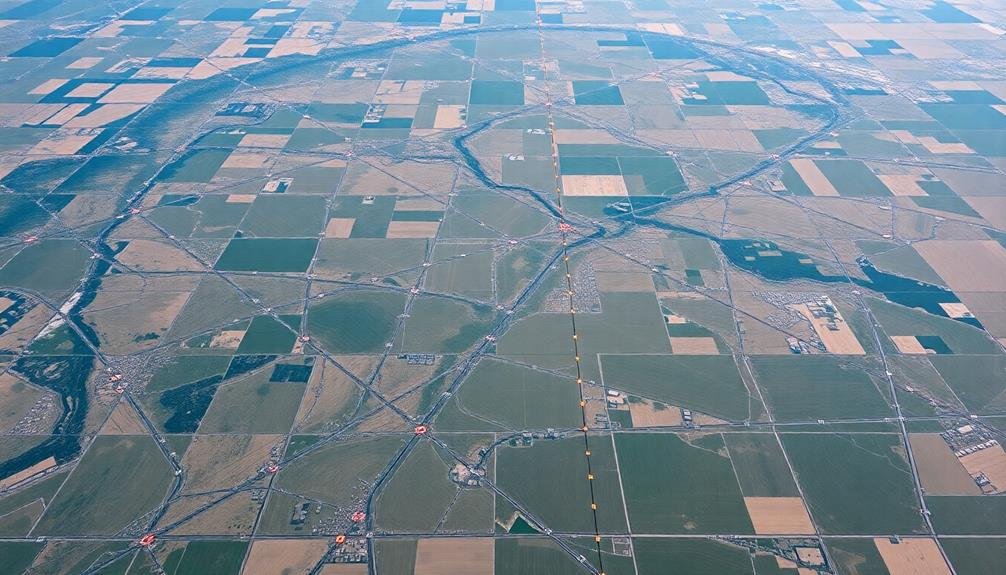
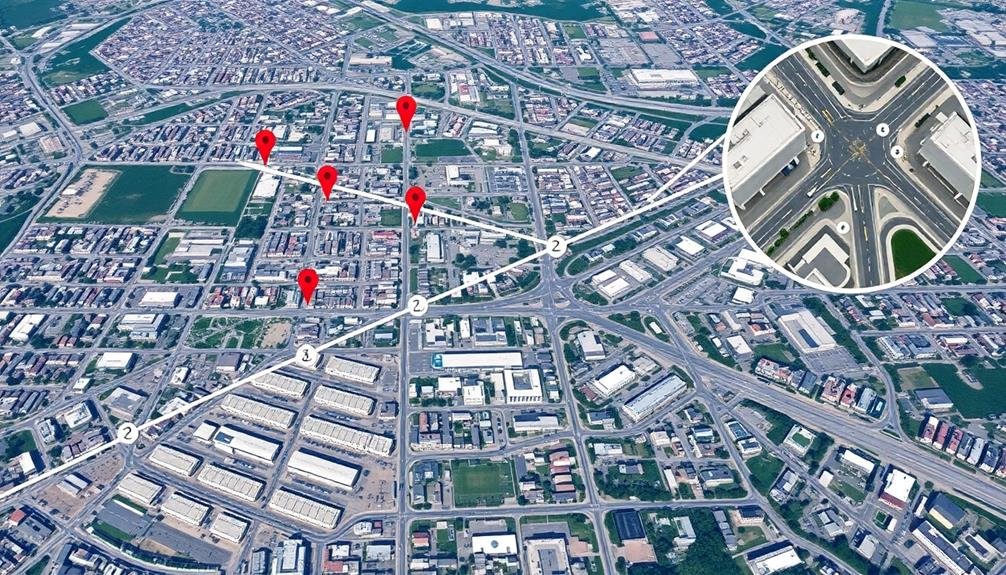
Precision forms the cornerstone of aerial triangulation adjustment, a vital process in georeferencing aerial imagery. You'll use this technique to refine the spatial accuracy of your aerial photos by adjusting their orientation and position. It's a complex mathematical process that minimizes errors in your photogrammetric block.
To perform aerial triangulation adjustment, you'll need to identify and measure ground control points (GCPs) visible in multiple overlapping images. These GCPs serve as anchor points, allowing you to align your imagery with known coordinates on the ground. You'll then use specialized software to calculate and adjust the exterior orientation parameters of each image.
The adjustment process involves iterative calculations, balancing the internal geometry of your images with external reference data. You'll need to carefully analyze residual errors and adjust your parameters accordingly.
Pay close attention to tie points between adjacent images, as these are essential for maintaining consistency across your entire dataset. By fine-tuning your aerial triangulation adjustment, you'll markedly improve the geometric accuracy of your georeferenced imagery, ensuring it aligns precisely with other spatial data in your GIS or mapping projects.
Frequently Asked Questions
How Does Weather Affect the Accuracy of Georeferencing Techniques?
Weather greatly impacts your georeferencing accuracy. Cloud cover can obstruct ground features, while strong winds may cause image distortion. Rain and fog reduce visibility, and temperature changes affect sensor performance. You'll need to account for these factors.
What Are the Cost Differences Between Various Georeferencing Methods?
You'll find that costs vary widely among georeferencing methods. Ground control points are often pricier due to field work, while automated techniques using existing data are cheaper. Consider your project's accuracy needs when choosing a method.
Can Georeferencing Techniques Be Applied to Historical Aerial Imagery?
Yes, you can apply georeferencing techniques to historical aerial imagery. You'll need ground control points, modern reference maps, and specialized software. It's challenging but valuable for studying landscape changes and creating time-series datasets.
How Often Should Georeferencing Equipment Be Calibrated for Optimal Accuracy?
You'll want to calibrate your georeferencing equipment regularly. It's best to do it before each project, but at minimum, calibrate monthly. Don't forget to check manufacturer recommendations, as some devices may need more frequent calibration.
What Are the Legal Implications of Using Georeferenced Aerial Imagery?
You'll need to take into account privacy laws, copyright issues, and licensing requirements when using georeferenced aerial imagery. It's essential to obtain proper permissions and guarantee you're not infringing on anyone's rights or violating regulations.
In Summary
You've explored ten powerful georeferencing techniques for enhancing aerial imagery accuracy. By implementing these methods, you'll greatly improve your spatial data quality. Remember, the best approach often combines multiple techniques. Don't hesitate to experiment with different combinations to find what works best for your specific projects. As technology advances, stay updated on new developments in this field. Your commitment to precision will elevate your mapping and remote sensing endeavors.
As educators and advocates for responsible drone use, we’re committed to sharing our knowledge and expertise with aspiring aerial photographers.


Leave a Reply